Other Transactions
This tab enables you to capture transactions of a general nature, for example:
- Payments received from medical aids and patients
- Other types of credit such as bad debts written off
- Debits such as interest charged and refunds
All transactions are captured in batches. This reflects the nature of how
most transactions originate. For example,
remittance advices
(received from medical aids) usually reflect payments for more than one patient. By capturing these payments together into one batch you are associating them together. At a later stage you are able to bring up the contents of a particular batch, which might be useful if you were querying a particular
remittance advice
.
In short, the idea is for each
remittance advice
to be captured into one batch.
Allocations
In simple terms allocations are links between payments and the transactions that
are being paid. Allocations make it possible for Panacea to calculate the
outstanding balance per charge item. This is important because medical
aids often short pay some charge items and may skip others altogether. By
having the outstanding balance per charge item you can identify where this has
happened and take appropriate action. Action may take the form of
transferring responsibility for payment to the
Person Responsible
or it may involve contacting the medical aid to point out their mistake.
Panacea's statements also indicate the outstanding balance per transaction,
which makes it clear to the recipient (person responsible or medical aid) where
they have short paid.
The Other Transactions tab is divided into 3 panels: Header,
Transactions and Allocations....
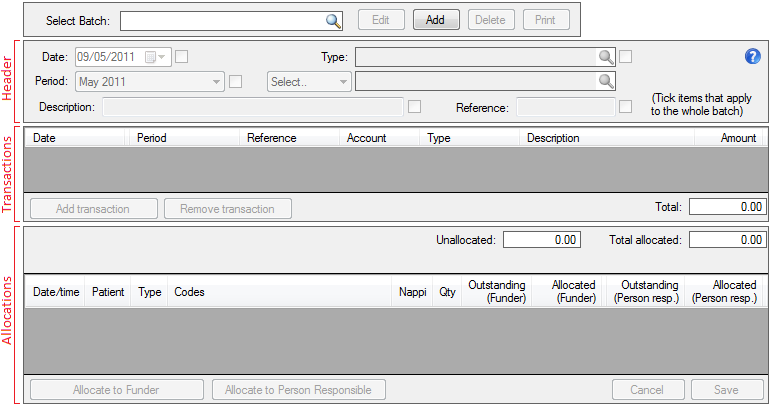
Header
This should contain information that describes what is in the batch. At a
later stage you will be able to retrieve the batch (if necessary) by searching
on fields in the header. It is a good idea, therefore, to provide as many
details as possible to make searching easier.
For example, if you are capturing a
remittance advice
from a medical aid (e.g.
Discovery) the header may be captured as follows:

Note the following:
- The Type field has been set to Payment by funder.
- The Select...
combobox
was clicked and Company selected.
- Discovery Health was specified as the company.
- The Description was automatically generated because the Type
and Company were specified.
- Most
remittance advices
from medical aids have some kind of unique reference.
This should be captured in the Reference field. This
uniquely links the batch to the original
remittance advice
. If you cannot
find a unique reference on the
remittance advice
then you could use the date of
the
remittance advice
instead.
Tick items that apply to the whole batch
You will notice that there is a
checkbox
next to most fields in the header. If you place a "tick" in a
checkbox
you are indicating that the value placed in the field next to it applies to
all transactions in the batch. For example, if you "tick" the
checkbox
next to Type: Payment by funder (see example above) you are
indicating that all transactions in the batch are payments by funders. In
this case Panacea will remove the Type column from the
transactions panel, since it knows that all transactions have Type
Payment by funder. If you wish to mix different types of
transactions in the batch you should NOT indicate the type in the header and you
should not place a "tick" in the
checkbox
next to the Type field.
Transactions
Once you have completed the relevant fields in the header you will move into the
Transactions panel. This panel is arranged as a grid. After
capturing each item (in a column) you can use the tab key to move to the next
column. Note that some columns may have been removed - see Tick
items that apply to the whole batch above.
After capturing all columns of a typical payment by funder the transactions
panel may look like this:
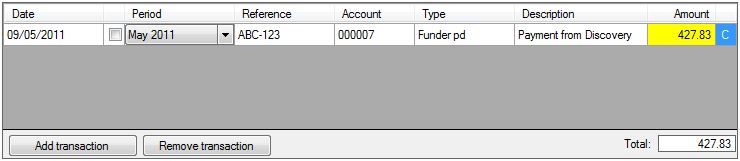
Notice that Panacea has highlighted the amount in yellow. This indicates
that the payment has not been fully allocated. i.e. you have not yet
indicated which transactions have been paid. You can now use the
Allocations panel to allocate the payment. Notice that once you
have captured the Account column in the Transactions panel
the Allocations panel will be updated to show the transactions on
that account.
Allocations
The Allocations panel shows how the current item in the
Transactions panel has been allocated against charge items. If you move
up or down in the Transactions panel the Allocations panel
will be updated to reflect the allocations attached to the current row in the
Transactions panel.
After capturing the payment above the Allocations panel may look like this:

Notice that the unallocated amount is also shown is yellow. The account
details, including balance and ageing are also shown (top left) for convenience.
In the example you will notice that there are unpaid amounts in the
Outstanding (Funder) column. There are a number of ways to
allocate the payment:
- Click Allocate to Funder. This will automatically allocate
the payment to the oldest unpaid items owing by the
funder
.
- Click Allocate to Person Responsible. This will
automatically allocate the payment to the oldest unpaid items owing by the
Person Responsible
.
- Click one of the
 buttons. This will allocate the full amount outstanding for that transaction.
- Click in the Allocated (Funder) or Allocated (Person resp.)
column and type in the amount you want to allocate.
Each time you allocate an amount the Unallocated and Total
allocated values will be updated. By the time you are finished
there should be zero in Unallocated. The exception to this
is when you are capturing an overpayment, i.e. the
funder
or
Person Responsible
has paid more than they owe. In this case you would leave the
overpaid amount unallocated.
After allocating the Allocations panel may look like this:
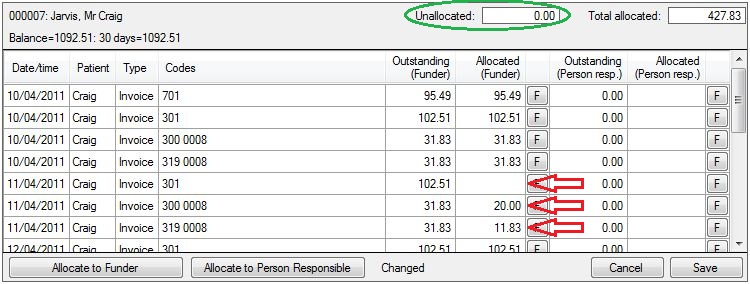
Notice that the Unallocated amount is now zero (circled in green).
Most transactions have been allocated in full, but notice that 3 transactions
(next to the red arrows) have been under allocated or not allocated at all (i.e.
they were short paid).
Allocating before entering the transaction amount
Sometimes you may not know the total amount being paid, but you do know the
individual amounts being paid. Some medical aids send
remittance advices
that do not show a total per account. Users would normally have to
calculate this total before capturing the payment, but Panacea gets around this
problem by allowing you to capture the allocations first. To illustrate,
the following shows the payment with an amount of zero:

You can leave the amount on zero and capture allocations like this:

Notice that Panacea shows the Over allocated amount in red.
The Transfer over allocated button will also appear. Once
you have finished allocating simply click the Transfer over allocated
button and Panacea will adjust the transaction amount to match the sum of the
allocated amounts.
Transferring amounts outstanding between the Funder and the Person responsible
While you are capturing a
remittance advice
from a medical aid you may discover
that they will not cover a certain charge item. It is good idea to
transfer this outstanding amount to the
Person Responsible
. This helps to make it clear on the statement that the
Person Responsible
is liable for that amount. Outstanding amounts can also be moved
in the opposite direction, i.e. from the
Person Responsible
to the
funder
.
|
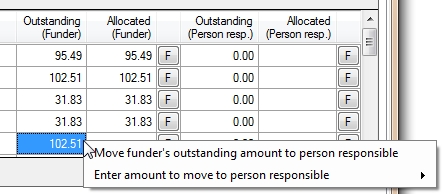
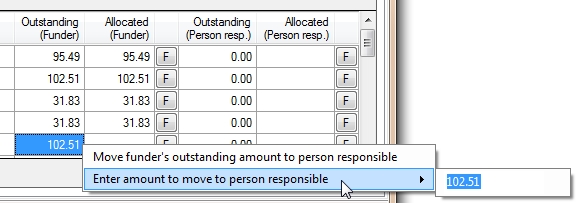
To transfer an outstanding amount right-click on the amount in the
Outstanding (Funder) or Outstanding (Person resp.) column. A
context menu will appear (see right) with two options:
- Move funder's outstanding amount to person responsible (or
vice-versa) - click on this to transfer the full outstanding amount.
- Enter amount to move to person responsible (or funder) - click on
this and Panacea will allow you to enter the amount you want to move
|
|
|
The screenshot on the right shows what happens after clicking Enter amount
to move to person responsible. Panacea suggests 102.51 in
this example but
you can change this to any amount that is less than the outstanding amount.
After entering the amount press Enter and Panacea will move it. |
|
|