Panacea Terminal Configuration
Note: The content on this page relates to Panacea version 7.2 onwards.
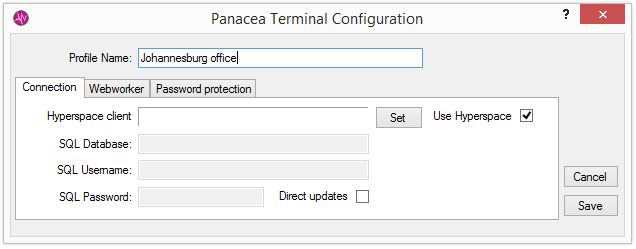
This window allows you to set up Panacea to connect to your database. The configuration information is contained in a Terminal Profile, and you can have more than one profile. This makes it possible, for example, to configure Panacea to connect to multiple databases, each of which can be on a different server. If you set up more than one Terminal Profile then Panacea will ask you to select the profile at the
Log in window
.
Note that the installer will configure your Terminal Profile automatically if you selected a "standalone" or "server" installation. However, if you selected "terminal" Panacea will automatically display the Panacea Terminal Configuration window when you execute it for the first time. The Panacea Terminal Configuration window can also be displayed by clicking the Panacea Configuration shortcut which is installed in your Panacea group.
There are two types of Terminal Profile:
- Hyperspace - Panacea connects to MySQL via a managed, virtual connection. Hyperspace connections are secure, and can be used over wifi and from remote sites over the internet. They are also a lot easier to set up. For more information on Hyperspace click
here
.
- Direct - Panacea connects direct to the MySQL server. Use this when Panacea and MySQL are on the same computer, or if you are using a secure "wired" (not wifi) network.
Setting up a new Terminal Profile using Hyperspace
|
 Click Add, then enter the following details:
Profile Name
You can enter something simple like "Default", but if you set up more than one Terminal Profile then you should use names that indicate where you are connecting to, e.g. "Johannesburg office" or "Pretoria office". Panacea will then allow you to choose between these profile names when you
log in
.
An authorised person needs to add a Hyperspace client on the server before you can continue. For details on how to do this click
here.
Make sure the Use Hyperspace
checkbox
is checked then click Set. The Set Hyperspace Client window will then be displayed.
|
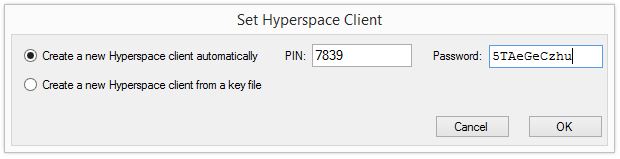
Create a new Hyperspace client automatically
 If you selected
Deliver Hyperspace client key automatically
when adding the Hyperspace client on the server then select Create a new Hyperspace client automatically on the Set Hyperspace Client window. Then enter the PIN and password that were displayed when setting up the Hyperspace client on the server. Please be very careful to enter upper- and lower-case letters correctly.
If you selected
Deliver Hyperspace client key automatically
when adding the Hyperspace client on the server then select Create a new Hyperspace client automatically on the Set Hyperspace Client window. Then enter the PIN and password that were displayed when setting up the Hyperspace client on the server. Please be very careful to enter upper- and lower-case letters correctly.
Click OK when done, then Save on the Panacea Terminal Configuration Window. |
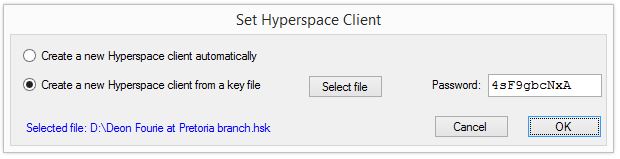
Create a new Hyperspace client from a key file
 If you selected
Deliver Hyperspace client key in a file
when adding the Hyperspace client on the server then select Create a new Hyperspace client from a key file on the Set Hyperspace Client window.
If you selected
Deliver Hyperspace client key in a file
when adding the Hyperspace client on the server then select Create a new Hyperspace client from a key file on the Set Hyperspace Client window.
Click Select file and a window will be displayed allowing you to select the file.
Then enter the password that was displayed when setting up the Hyperspace client on the server. Please be very careful to enter upper- and lower-case letters correctly.
Click OK when done, then Save on the Panacea Terminal Configuration Window. |
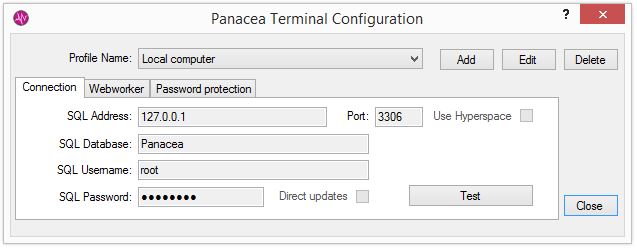
Setting up a new Terminal Profile using direct connections
 Click Add, then enter the following details:
Profile Name
You can enter something simple like "Default" or "Local computer", but if you set up more than one Panacea Terminal Profile then you should use names that indicate where you are connecting to, e.g. "Johannesburg office" or "Pretoria office". Panacea will then allow you to choose between these profile names when you log in.
Make sure the Use Hyperspace
checkbox
is unchecked, then enter the following:
SQL Address
Enter the IP address of the MySQL server. If you are setting up a Terminal Profile that connects to MySQL on your own computer then enter "127.0.0.1".
Port
Enter the TCP port of the MySQL server. This is usually 3306.
SQL Database
Enter the name of the Panacea database you want to access. The default is "Panacea".
SQL Username
Enter the MySQL username. MySQL users can be set up by selecting System - Manage Database - Manage SQL Users in Panacea on the server.
SQL Password
Enter the MySQL password that was configured for this user.
Direct updates
This
checkbox
tells Panacea where to obtain software updates. The default is to leave it unchecked, which tells Panacea to obtain software updates from your own server. However, if you want to force Panacea to download software updates direct from the Datamax servers then check this
checkbox
. This can be useful for terminals that connect over slow VPN connections. In general it is recommended that you leave it unchecked.
Test button
Click this button and Panacea will test your settings by attempting to make a connection to your MySQL server.
Webworker tab
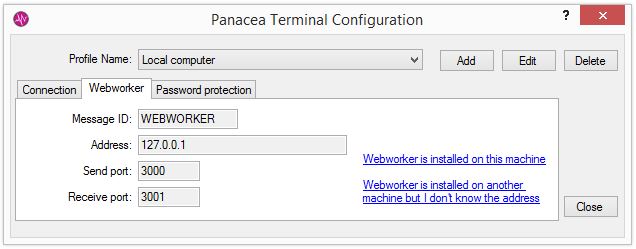 This tab allows you to configure how Panacea communicates with Webworker. On Terminal Profiles that use Hyperspace only the Message ID is configured. This tab allows you to configure how Panacea communicates with Webworker. On Terminal Profiles that use Hyperspace only the Message ID is configured.
Message ID
Set this to WEBWORKER unless advised otherwise by Datamax.
Address
The IP address of the computer on which Webworker is installed. If Webworker is installed on your own computer then enter "127.0.0.1".
Send port
The UDP port used to send messages to Webworker. Set this to 3000 unless advised otherwise by Datamax.
Receive port
The UDP port used to receive messages from Webworker. Set this to 3001 unless advised otherwise by Datamax.
Password protection tab
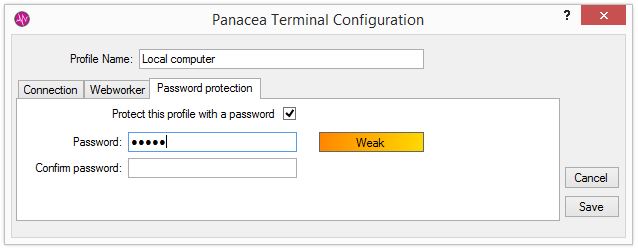 This tab enables you to password protect a Terminal Profile. Password protecting a Terminal Profile significantly increases security by making it impossible for anybody to use or modify the Terminal Profile unless they know the password. This tab enables you to password protect a Terminal Profile. Password protecting a Terminal Profile significantly increases security by making it impossible for anybody to use or modify the Terminal Profile unless they know the password.
To password protect the Terminal Profile check the Protect this profile with a password
checkbox
. You must then enter a password in the Password field.
Panacea will indicate how "strong" or "weak" the password is that you have entered. Strong passwords contain both upper- and lowercase letters, numbers and symbols (e.g. @%* etc). You should avoid repeating characters (e.g. "aaa") or having sequential characters (e.g. "123" or "abc").
Once you have entered a Password you will be required to re-type it exactly in the Confirm password field.
|