eClaims Settings
This tab allows you to configure your site and practice eClaims settings.
Note that all items in the This practice group apply only to the
currently selected practice. Items in the Webworker settings
group apply to your site as a whole. i.e. they apply to all practices
administered by your Panacea.
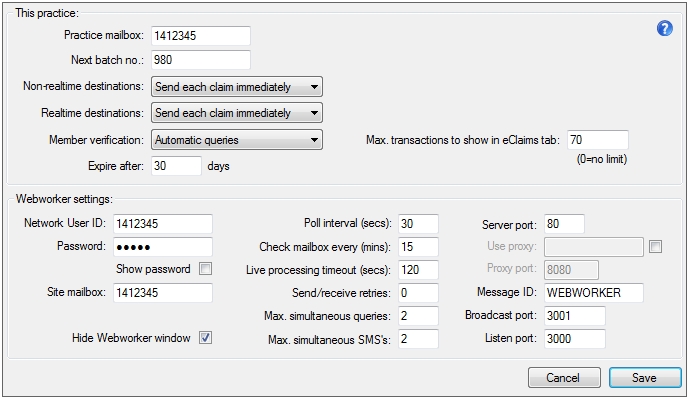
This practice
Practice mailbox
This will be allocated to you by Datamax when you register your
practice. Only use the mailbox number allocated by Datamax.
Next batch no.
Each time Panacea sends eClaims it allocates a batch number to all the
transactions being sent. If you have just signed up with Datamax for the
first time you should start on batch 1. However, it is sometimes necessary
to set a different batch number, but this should only be done with the close
supervision of Datamax.
Non-realtime destinations and Realtime destinations
Realtime
destinations
are able to assess your claim immediately and provide feedback on whether your
claim will be paid. Non-realtime
destinations
do not have this capability. It is recommended, therefore, to send claims to
Realtime
destinations
immediately after you capture each invoice. For more details on realtime and
batch eClaims click
here
.
The following options are available for Non-realtime destinations
and Realtime destinations:
- Do NOT send electronically - this instructs Panacea not to send
the claims electronically, i.e. you will need to print statements. This
option is not recommended unless you run a "cash practice".
- Send each claim immediately - after you capture each invoice and
click Save Panacea will take you to the
Prepare eClaim tab
, enabling you to send the invoice immediately as an eClaim.
- Send claims in batches - Panacea will not take you to the
Prepare eClaim tab
after saving each invoice. Instead you will need to go to eClaims - Send
all unsent eClaims or eClaims - Send unsent eClaims captured by
you to send the claims. This enables you to accumulate eClaims and
send them all together at the end of the day.
Member verification
This setting determines whether Panacea verifies the accuracy of your
patient's medical aid details. This feature occurs in the background and
does not cost anything. It is highly recommended that you use it to ensure
that your medical aid claims are accurate. Other useful information is
also obtained, for example the patient's plan name and benefit period.
- No automatic queries - Panacea will not verify medical aid details
- Ask before adding a query - A
checkbox
will be displayed (when adding a new
beneficiary
) asking if you want to Verify membership details.
- Automatic queries - Panacea will automatically verify membership
details each time a beneficiary is added. This is the recommended setting.
Expire after
This setting tells Panacea how long membership queries should be
regarded as valid. Once they have expired Panacea will automatically
re-verify the membership details when a new
invoice
is captured. This is important because medical aid membership details can
change, for example a patient can be suspended for non-payment of their medical
aid subscription.
Max. transactions to show in eClaims tab
This allows you to restrict the number of transactions shown in the
eClaims tab
. This may be useful if you want to avoid dealing with huge batches that
may have accumulated since you last sent your unsent eClaims. It is also
useful on systems with low resources, since large eClaims batches may result in
Panacea running out of RAM.
In general, however, it is recommended that you leave this setting on zero.
This results in no restrictions on eClaims batch size.
Webworker settings
Network User ID
This is a unique code allocated to your site by Datamax. Only
enter the NUI provided by Datamax.
Password
This is also supplied by Datamax and is used by
Webworker
to log onto the eClaims system.
Show Password
Use this
checkbox
to show or hide the password (see previous field).
Site mailbox
This is also allocated by Datamax. Datamax will allocate a
mailbox through which all practices at the site communicate with Datamax.
Hide Webworker window
This determines if the Webworker window should be visible. By
default the Webworker window will be hidden and a small icon
 will be displayed in the tray (the bottom right of your screen). Click on
the icon to display the Webworker window.
will be displayed in the tray (the bottom right of your screen). Click on
the icon to display the Webworker window.
Poll interval
This determines how often Webworker will check if it has any tasks to
perform. It is recommended that you set this to 30 seconds.
Check mailbox every
This determines how often Webworker checks your mailbox for items to
download. It is recommended that you set this to 15 minutes.
Live processing timeout
This determines how long Webworker will wait for
realtime eClaims
to be processed. If a realtime eClaim takes too long Webworker will end the
connection and check back later for the
switch response
and
assessment response
. It is recommended that you set this to 120 seconds.
Send/receive retries
This determines how many times Webworker will retry a failed
connection to Datamax. In general this can be left on zero.
Max. simultaneous queries
This determines how many medical aid membership queries can be
performed at the same time. It is recommended that you set this to 2.
Max. simultaneous SMS's
This determines how many SMS's can be sent at the same time. It
is recommended that you set this to 2.
Server port
This is the TCP/IP port used by Webworker to connect to Datamax.
The default of 80 is recommended. However, Datamax may recommend using a
different port. You should only change the port if instructed to do so by
Datamax.
Use proxy
If you place a check in the
checkbox
the Use proxy and Proxy port fields become
available. This can be used to configure Webworker to use a proxy,
although this is not recommended if it can be avoided. Place the IP
address of the proxy in the Use proxy field and then enter
the appropriate proxy port in the Proxy port field. You will
need to consult your network administrator to obtain these settings. Note
that Webworker is currently not able to use proxies that require authentication.
Message ID
This should be left as WEBWORKER unless you are advised
to change it by Datamax.
Broadcast port
This is the UDP port used by Webworker to broadcast it's status to
Panacea users on your network. It is recommended that you set this to
3001.
Listen port
This is the UDP port used by Panacea terminals to communicate with
Webworker. It is recommended that you set this to 3000.
|