Installing Panacea
Panacea is installed directly from the Panacea website. Detailed step-by-step
instructions are given on the website to guide you through the process. Go to
www.panacea.co.za
for more information.
If you are upgrading from Panacea 6.3e, please read
Upgrading from Panacea 6.3e
immediately after installing Panacea 7.
If you run Panacea and no practices have been set up (e.g. the first time you
run Panacea) you may be presented with a pop up window which asks "Would
you like to set up a practice?". If you answer Yes
Panacea will start the Add Practice Wizard. Click
here
for details on adding a new practice using the Add Practice Wizard.
Setting up a Terminal
If you are using Panacea 7.2 or later, please click
here
.
Once you have installed Panacea and everything is up-and-running, you can
install Panacea on additional computers on your network (if you have one).
This enables you to access your practice database from more than one computer at
the same time, which has many obvious advantages. Setting up a terminal
has some technical steps which should probably be carried out by somebody with
technical experience.
Before installing Panacea on a terminal, you must first carry out a
number of steps:
Step1: Fixed IP for server
First, ensure that the computer on which you installed MySQL has a fixed IP
address. By default, most Windows computers are configured to obtain their
IP address automatically (using DHCP), but this will cause problems later on.
Once you have configured a fixed IP address make a note of it as this will be
needed later. Click
here
for more info on setting up a fixed IP address.
Step2: Firewall Exception
By default, most antiviruses and firewalls
(including Windows firewall) will block incoming connections. It is
necessary to add an exception (or "rule") to allow incoming TCP connections on
port 3306 (or 3307 if you selected that port during installation). You should also allow UDP ports 3000 and 3001, which are used
for communication between Panacea terminals and Webworker.
Step 3: Configure MySQL
By default MySQL will not allow connections from
other computers. In Panacea click on System - Manage Database -
Manage SQL Users. On the displayed window you will see "To add a
user that can connect from anywhere click here".
Click on the word "here". Panacea will add a user with the name root
that can connect from %. % is a wildcard that enables connections
from any IP address. If you want to restrict access from specific IP
addresses you can do so by editing this user and replacing the % with specific
IP addresses.
Step 4: Install Panacea
Install Panacea on the terminal in the normal way,
but make sure that you do NOT install MySQL and Webworker. The
second screen of the installer has a checklist of items to install. You
must make sure that MySQL and Webworker are NOT checked.
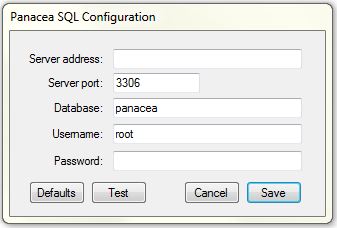
 After installing Panacea you will see the SQL Configuration window. In the
Server address field enter the IP address which you set in step 1
above. Click Test to see if the terminal can make a
connection to the server. When you are finished click Save.
Your Panacea terminal is now ready. After installing Panacea you will see the SQL Configuration window. In the
Server address field enter the IP address which you set in step 1
above. Click Test to see if the terminal can make a
connection to the server. When you are finished click Save.
Your Panacea terminal is now ready.
|