Accounts
In Panacea 7 an account is a collection of billing information. A person
can have more than one account. For example, a person could have an
Injury on Duty account for a work-related injury as well as a
Medical Aid account for other charges, e.g. sports injury. Below
is a typical example of a medical aid account: 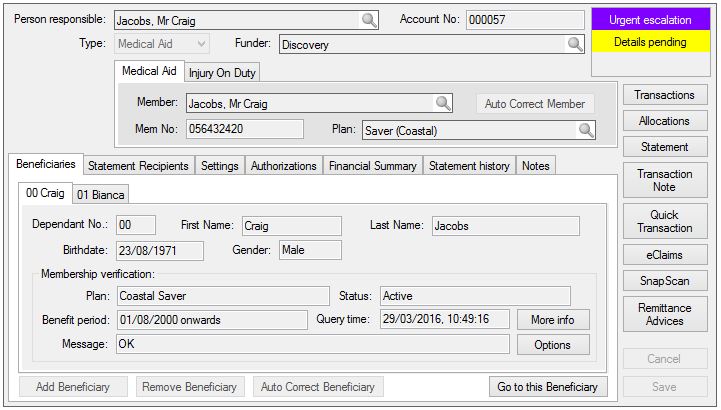
Person Responsible
Every account must have a Person Responsible. As the name
suggests this is the person who is responsible for the account. On medical
aid accounts the Person Responsible would normally be the medical
aid Member. The Person Responsible would also
be the person you would call if the account became overdue.
Where a young patient is being treated you should avoid entering that patient as
the Person Responsible. Rather specify a parent or guardian
as the Person Responsible.
Type
The account type can be either:
- Medical aid: the patient is an active member of a medical aid.
- Injury on Duty: the patient is being treated for a work-related
injury and the account will be paid by the WCA commissioner or another
Injury on Duty funder, e.g.
CompSol or Rand Mutual.
- Private: the Person Responsible will be expected to pay the
account.
Tip: Many of the fields on the account will be repeated. For example, the
Person Responsible will often be the Member of the
medical aid. That person will probably also be a Beneficiary
and a Statement Recipient. To make things easier, Panacea
will suggest the most likely person if you right-click or press the down-arrow
when on one of these fields. This is actually a standard feature of
PowerComboboxes. For more info click
here
.
Funder
The funder is a
company
that is expected to either fully or partially fund (or pay) the account. In
most cases this is a medical aid (e.g. Discovery, Bankmed etc), but in the case
of Injury on Duty accounts it might be the WCA commissioner or
CompSol
. You can even enter a funder for private accounts.
Account Categories
Note: this feature is only available from version 7.1 onwards.
In the top right hand corner of each account is a small box which displays
Account Categories
that have been set on the account. Each account can have one or more categories. However, the top one determines which background colour is used when displaying the account in lists, reports and
selectors
.
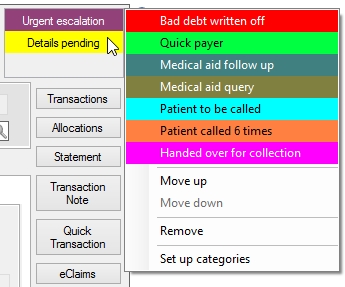 To set an
Account Category
simply right-click on the box. A context menu will be displayed (see image right) with a list of available
Account Categories
. Click on one of them and it will be added to the account.
To set an
Account Category
simply right-click on the box. A context menu will be displayed (see image right) with a list of available
Account Categories
. Click on one of them and it will be added to the account.
You can also click on Move up or Move down to move the category (which you clicked on) up or down. This can be used to change which category on the account is the top one, which (as mentioned) determines the background colour.
Click Remove to remove the category (which you clicked on) from the account.
Click on Set up categories to go to the
Account Categories
tab where you can add new categories and change existing ones.
|
Medical Aid tab
Member
The main member of the medical aid. Ensure that all the main
member's initials have been entered correctly, as this is used for eClaims.
The Auto Correct Member button will correct the
member's details using information obtained from the cardholder query.
Note: you must be editing the account for the Auto Correct Member
button to be enabled. (See Membership Verification below.)
Mem.No (Membership number)
The medical aid membership number,
precisely as printed on the membership card.
Plan
The patient's medical aid plan can be selected here.
(This field is only available from Panacea version 7.0.22 onwards).
Membership Verification
Panacea will automatically verify the membership details of the medical aid
patients that you capture. This will enable you to identify incorrect
membership details before you send eClaims, saving you a lot of time and hassle.
It also helps to prevent fraud. The verification process is very quick and
will usually be completed within seconds of you capturing a new account.
This means that the patient will probably still be sitting in the waiting room,
enabling you to rectify the problem immediately. Note: the membership
verification facility is only available for participating medical aids.
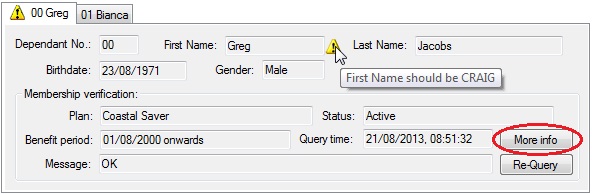 After you save a new account, Panacea will verify all
the beneficiaries on the account. If it finds a problem with any of the details
it will display a small yellow triangle next to the relevant field (see picture). If you
move your mouse over the triangle it will display a message indicating what the
problem is.
After you save a new account, Panacea will verify all
the beneficiaries on the account. If it finds a problem with any of the details
it will display a small yellow triangle next to the relevant field (see picture). If you
move your mouse over the triangle it will display a message indicating what the
problem is.
Note that membership queries can only performed if you have entered the correct
membership number and beneficiary date of birth. If these details are
correct, then Panacea will be able to make helpful suggestions on how to correct
the data. In fact, if you click Auto Correct Member or
Auto Correct Beneficiary Panacea will actually make the necessary
corrections for you.
Certain medical aids will also provide additional information. If you see a More info button (see picture, circled in red) then clicking the button will display additional information about the patient's medical aid plan.
Injury on Duty tab
 Injury on Duty accounts require you to capture the patient's employment, WCA and
injury details:
Injury on Duty accounts require you to capture the patient's employment, WCA and
injury details:
Employer and Employee No.
The patient's employer and employee number as at the date of work
related the injury.
Ref No.
The WCA case or reference number.
Beneficiaries tab
A beneficiary is a person that has been linked to an account for the purpose of
invoicing. You cannot charge for services rendered to a patient until they
have been added as a beneficiary on an account.
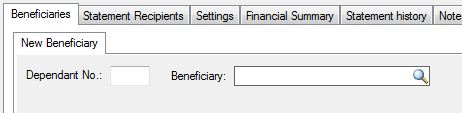 When you click Add Beneficiary a New Beneficiary tab will appear.
Enter the patient's Dependant number if available. Dependant
numbers are usually two-digit numbers, e.g. 00, 01 etc.
The Beneficiary
PowerComboBox
enables you to select the person you want to add as a beneficiary. Remember
that right-clicking or pressing the down-arrow will make useful suggestions.
In general you can add multiple beneficiaries to an account, except with
Injury on Duty accounts which can have only one beneficiary.
Funds Checks
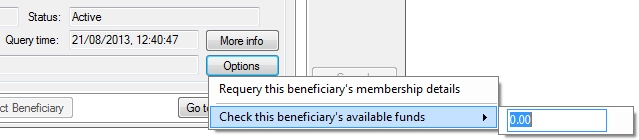 Certain medical aids allow you to check if a patient has sufficient funds. If you see an Options button on the beneficiary tab instead of the Re-Query button then clicking this button will display a context menu, see picture.
If you move your mouse over the Check this beneficiary's available funds menu item a box will be displayed where you can enter the amount you would like to query. Click in the box then enter the amount, e.g. 500. Press Enter once you have entered the amount. Panacea will confirm the amount then check in the background, i.e. you can carry on working. Once the check is completed Panacea will notify you via the
Messages Window
.
 If you have performed funds checks before for this beneficiary then the context menu will also give you access to the beneficiary's Funds availability history. You can also delete previous funds checks using the Delete funds availability history menu item. If you have performed funds checks before for this beneficiary then the context menu will also give you access to the beneficiary's Funds availability history. You can also delete previous funds checks using the Delete funds availability history menu item.
|
Statement Recipients tab
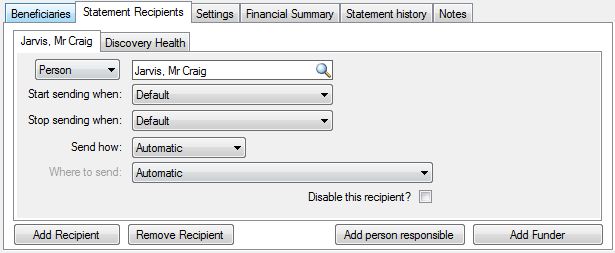 This tab enables you to configure who will receives copies of statements.
In general you may choose to send a statement to the Person Responsible,
although you could send a statement to any person or company on your database.
This tab enables you to configure who will receives copies of statements.
In general you may choose to send a statement to the Person Responsible,
although you could send a statement to any person or company on your database.
Note that you can configure Panacea to add the
person responsible
as a
statement recipient
automatically. Click here for more info.
For a detailed explanation of Statement Recipient defaults click
here
.
Panacea provides a high degree of control over how statements are sent, but it is
usually sufficient to simply click Add person responsible and/or
Add Funder. In general you can also leave the various
settings on Default or Automatic. Don't make
unnecessary work for yourself by configuring each and every setting for every
account.
If, however, you have a specific situation in which you want to control precisely
how and when statements will be sent on an account then click Add
Recipient and configure the fields according to the advice below.
When adding a statement recipient you must first choose whether you are adding a
person
or a
company
, after which you will choose which person or company using the
PowerComboBox
.
Start sending when
Determines when to start sending statements to this recipient.
This works according to the ageing of the account balance (i.e. current, 30
days, 60 days etc). For example, if you select 60 days then
Panacea will not send a statement to this recipient until the account balance
ageing reaches 60 days. In general you can select Default,
which means that the setting will be determined by your Statement settings.
Stop sending when
Determines when to stop sending statements to this recipient.
This also works according to the account balance ageing. Selecting
Never means that Panacea will not stop sending statements to this
recipient, but note that when generating statements at the end of the month one
would normally exclude accounts with a zero balance. In general you can
select Default, which means that the setting will be determined by
your Statement settings.
Send how
Determines whether the recipient's statement should be sent by email
or by post (i.e. printed on paper). In general you can select
Automatic, which means that the setting will be determined by your
Statement settings. Note, however, that regardless of your settings
Panacea will send a statement on paper if the recipient does not have an email
address.
Where to send
Determines a specific address or email address to use when addressing
the statement. If you select Automatic then Panacea will use
the person's (or company's) preferred address or email address. Note: when
adding an address to a person or company there is a Preferred address
field. There is also a Preferred? checkbox column on their
emails tab. These determine which address or email address is used when
Automatic is selected in the Where to Send field.
Disable this recipient?
This
checkbox
allow you to stop sending statements to this recipient. For example, if you
find out that a statement recipient has changed address you may want to disable
them temporarily until their new address has been established.
Settings tab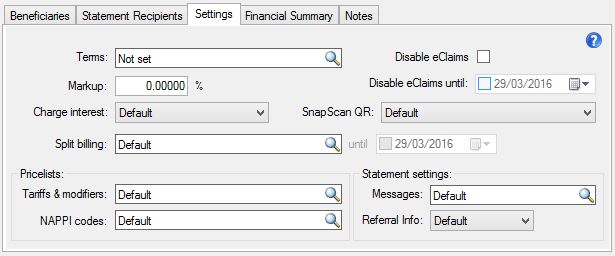
This tab allows you to configure various settings for the account. Resist
configuring each and every item just "to be safe". Use the defaults unless
you have specific reasons to override them.
Terms
This enables you to offer a settlement discount on the account.
If set, Panacea will print a message on the statement specifying the amount that
should be paid and the date by which it must be paid. See
Settlement Terms Configurations
for information on setting this up.
Markup
This enables you to modify the prices charged on this
account. For example, a markup of 20% will instruct Panacea to charge the
normal prices plus 20%. Negative markups can also be used to reduce the
prices charged.
Charge Interest
This enables you to charge interest on the account if it becomes
overdue. See
Interest Defaults
for details on what Panacea will do if you set this field to Default.
Disable eClaims
If you check this
checkbox
Panacea will not send eClaims for this account. If the patient has run out
of benefits it may be better to use the Disable eClaims until field (see
below).
Disable eClaims until
If you place a check in the
Date Picker
this will enable this field. You can then specify a date. Panacea will
not use eClaims for invoices where the invoice date is less than the date you
specify. This is especially useful where a patient runs out of benefits.
You can enter the last date of the patient's current benefit year. Panacea
will then use eClaims again once invoices in the next benefit year are captured.
SnapScan QR
This
ComboBox
allows you to override the default SnapScan settings on this account when a statement is generated. The following options are available:
- Default - The default SnapScan settings are used.
- Reflect person responsible portion - The SnapScan QR code will contain the amount owing by the person responsible for the account. i.e. the medical aid portion is excluded. This is generally the best option because the patient only pays their portion, and the medical aid pays the rest. Panacea's realtime
eClaims Assessment Responses
provide accurate details on amounts covered by the patient's medical aid, so it is not necessary to recover these amounts from the patient first. Just make sure you click Transfer Shortpaid when an assessment reflects a short payment. This will ensure that the "person responsible portion" includes shortpaid amounts.
- Reflect full amount outstanding - The SnapScan QR code will contain the full amount outstanding on the account, i.e. both the patient's portion and the medical aid's portion. This can obviously result in double payment and is not recommended. However, it may be desirable for practices that require full payment by the patient, preferring the patient to then "claim back" from the medical aid.
- Don't show on statement - Panacea will not display a SnapScan QR code on the statement.
Split billing
This enables you to split the amounts charged between the funder and
the person responsible. See
Split Billing Defaults
for details on what Panacea will do if you set this field to Default.
Pricelists
Tariffs & modifiers / NAPPI codes
These fields
determine what amounts are charged for tariff codes, modifiers and NAPPI codes.
See
Pricelists Defaults
for details on how Panacea will determine which pricelist to use if you set this
field to Default.
Statement settings
Messages
This field selects which statement messages should be printed on
statements for this account. Normally this can be left on Default,
but you may want specific messages to be printed. For example, if the
patient is deceased you may want to print a message requesting the details of
the executor of the estate. See
Statement Messages Defaults
for details on what messages will be used if you set this field to Default.
Referral Info
This field determines if Panacea will print referral info on the
statement. Referral info includes the referring doctor and his/her
practice number. See
Referral Info Defaults
for details on what Panacea will do if this field is set to Default.
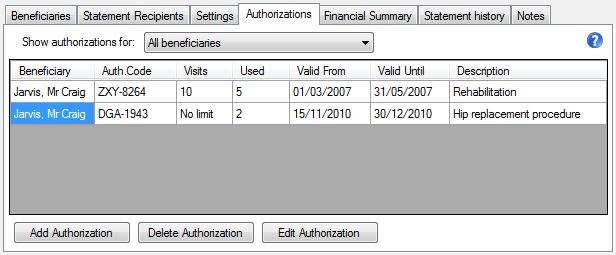
Authorizations tab
This tab allows you to maintain a table of authorizations for beneficiaries of
this account. Many medical aids require patients to obtain authorization
before receiving certain services. For example, they may require
authorization prior to hospital admission or before a surgical procedure is
performed.
See
Authorizations
for more details on adding and editing authorizations.
You should obtain authorization details before providing the authorized service.
You should also capture the authorization info in Panacea before capturing the
invoice (for the authorized service). This will enable Panacea to link the
authorization automatically when you capture the invoice. For more info on
linking an authorization with an invoice click
here
.
|
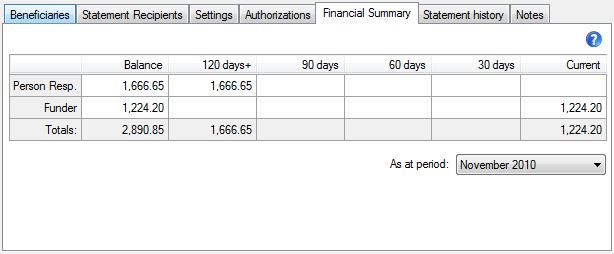
Financial Summary tab
This tab shows the ageing of the account balance split between the Person
Responsible and the Funder.
As at period
By default Panacea will show the ageing as at the current period
(based on today's date). However, you can see what the ageing was at a
previous period by selecting the desired period from the
combobox
.
|
 Statement history tab Statement history tab
This tab shows a list of statements that have been generated for this account.
This is useful, for example, where a patient claims not to have received a
statement. It is very easy to check on their account if a statement was
generated.
You can also view an original image of the statement by double-clicking on the
item in the list. Panacea will then display a PDF image of the statement,
which can be re-printed if necessary.
If you right-click on a statement a context menu will be displayed with the options View statement and View file.vu info. Click View statement to view a PDF image of the statement (same as double-clicking above) or click View file.vu info to check on whether the recipient has viewed the statement (password-protected statements only). Click
here
for more info.
The Run column will show a number. Each time statements are
generated (Tools - Generate Statements) a new Run number is
created. This is just a simple way of keeping track of each statement run.
The Doc.No. column displays the unique document number that was
printed on the statement. Note that you can search for an account using this
document number using the
Account Selector
.
The Recipient column shows the name of the person or company that
the statement was addressed to. When generating statements automatically (Tools
- Generate Statements) the recipient comes from each account's
Statement Recipients tab. However, statements printed individually
allow you to select any person or company as a recipient. For more info on
generating single statements click here.
The ageing of the account balance is also shown as at the time the statement was
printed.
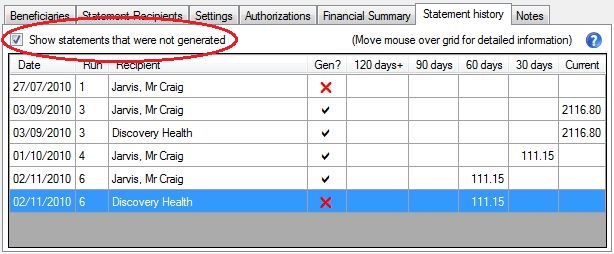
If you check the
Show statements that were not generated
checkbox
, Panacea will add a Gen? column which indicates if a statement
was generated at each statement run. A black tick indicates that a
statement was generated. A red X indicates that a statement was not
generated.
This can help you to understand what factors or settings resulted in a statement
not being generated.
|
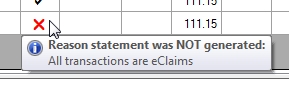
If you move your mouse over a red X Panacea will show you the reason that a
statement was not generated for the recipient at that statement run. Note
that only statement recipients that existed at the time the statements were
generated will appear in the list, i.e. if you added a statement recipient
to an account after statements were generated then that statement
recipient will not appear in the history.
|
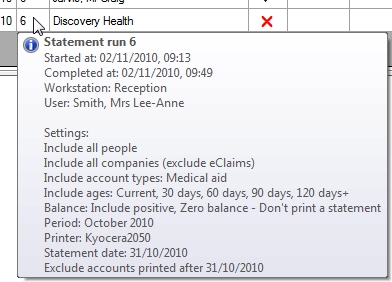
It may also be useful to see what settings were
used when the statements were generated. If you move your mouse over the
Run column Panacea will show you all the settings that were used
when that statement run was generated. This should further assist you in
establishing why a statement was (or was not) generated for a particular
statement recipient.
|
Notes tab
This tab allows you to type notes related to this account. For example, you
may want to make notes about a conversation that you had with the
Person Responsible
regarding an overdue account and any payment arrangements that were agreed on.
Account notes can be printed on the Age Analysis to assist in account
management.
Buttons available on the Accounts tab
|